Quantcast
Viewing all 217 articles
Browse latest View live

Better accuracy from your encoder without more interrupts

Since I published my DC motor control project on youmagine I have got some feedback from users with 2000 PPR (pulses per revolution) encoders or more where they end up having trouble above 3000 RPM. The reason is that the poor Arduino cannot process the interrupts fast enough and the system becomes unreliably.

While optical encoders are available quite cheaply, some of the magnetic sensors from AMS are very competitive and offer very good accuracy (from 12 to 16 bits). One interesting model (due to its low price) is the AS5600, that provides a 12bit angle measurement for less than $2. Measurement data is read by means of an I2C serial bus and needs no interrupts.

Hopefully those having trouble with interrupts can switch to this type of sensor, but model AS5600 is most likely a bad choice as it is intended to replace manual knobs in hi-fi equipment and it will not work at high RPMs (in fact the manufacturer does not provide the max RPM at all).

But for position control applications maximum speed will not reach more than a few hundred RPM tops and for those this cheap sensor maybe a good fit.

I contacted moti project developer who is using this same sensor for his intelligent servo and he was pleased with it.

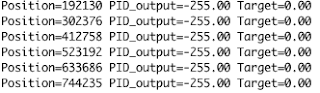
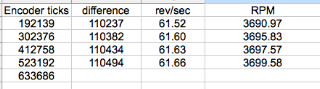
While chip manufacturer provided an Arduino library I cut the only piece of code I was interested and copy it to my project as a simple function. Time measurement showed that a standard I2C speed (100Khz) took 0.92 milliseconds, but after pumping up the I2C clock speed I lower it to 0.22 milliseconds.

One additional thing to address if your application uses multiple turns is how you manage the wrap around of the angle measurement. It took me a while to figure it out, but within a certain bound of rotational speeds checking for a gap between previous and current value larger than 3500 did the trick for me.

Below you can see a piece of code to get you started, providing a measurement between 0 and 4095 representing an angle between 0 and 360 degrees.


Presentations' clock

Image may be NSFW.
Clik here to view.
I was recently invited by Pablo Murillo to give a talk at Zaragoza Maker Show and I wanted [among other things] to present and hands-on project to the audience, outlining the process I followed to get it done.

I was lucky my friend and fellow "Arduinist" Colin Dooley gave me away a 15-led addressable RGB stripe a while ago. Unfortunately, the Cylon effect (aka Lasrson scanner for those old enough) was already taken as one example from FastLED library, so I had to do something else.

I have chosen the title "Beyond Blink" for my talk, so it would be nice to get something that, while blinking, performed a more useful work. So what I decided was to use the 15-led stripe as some sort of presentations clock, that will help the speaker to know the time elapsed, a new led lit each minute, while of them is blinking each second.

But as many talks are longer than 15 minutes, I repeated the same pattern with changing colours for each next quarter. Red being the last color, since third quarter on. Talks should probably be no longer than 45 minutes anyway.

Later I thought that this contraption may also be of interest for the audience, so they too have some feedback on how time is passing during the talk, so I ended up placing it facing to the public during my talk.

I have made no effort on getting a very accurate time measurement, so I won't be surprised if is the thing is a bit off after half an hour, but if there is shift I assume it would be pretty small. Time starts ticking as soon as you plug it in. I used a USB port on the same laptop used for my presentation and I rushed to finish my talk during the allocated time frame. Looking at it instead of checking your watch during the talk looks likely better too.

I told the audience it would be my Christmas gift for them to post the code, so no matter you celebrate it or not you can grab it from here too.

Hardware-wise you just need three wires to connect the stripe to the Arduino, +5V, GND and data pin. I am using D9 pin as a data pin, but you may change it to any other pin you want. Please note you need FastLED library installed on you Arduino IDE or you get a compile error.  For a portable unit you can use an Arduino Pro Mini and a battery or a Nano or Pro Micro and a USB power bank.

Wifi DC motor controller?

A few days ago I was talked on G+ by my friend Mauro Manco with an idea that was a bit weird at first: we all have heard about ESP8266 SoC that can bring Wifi happiness to out Arduino projects for a few dollars.

What Mauro suggested is that this same unit might handle the servo code I have written for an Arduino. That was in part possible by the release of an SDK that allow us to program it the same way as a regular Arduino, so code-wise, programs are compatible. In a few attempts Mauro managed to get my code to compile happily for the ESP.  But he wanted me to try it out so he was as kind as sending me a NodeMCU board to my home so I could give it a try.


It just arrived at noon and I could not resist to give it a try, as usual not without some minor problems. The first one was that the NodeMCU did not show up as a serial port in my Macbook. I tried installing the CH340 driver to no avail. After using a magnifying lenses I realised that the USB to serial adapter on my board it was really a Prolific CP2102 chip instead. So just after another driver install, this time the right one, the board showed up in my computer as a serial port and I was able to compile, upload and test the mandatory Blink example :-) all from the familiar Arduino IDE.


Next step was to check whether or not the processor was up to the task of a time-critical interrupt code. I connected the encoder inputs to the module and set my motor at full speed. And I capture some samples of the motor position each second, as shown below:


It seemed it was working ok, but to be sure I needed to do the math, and I prefer the computer to do that for me.


So I could see the motor was running at around 3700 RPM, which was consistent with the no load speed at 12V supply. So my guess is that interrupts are not lost here as that was the worst case scenario for this motor. 

Please note that the business till now is just a change from the b-bit 16 Mhz Atmel 328 or 32u4 processor to the ESP's 32-bit SoC 80Mhz processor. As it was expected the system is clearly much faster and it can handle speeds the Arduino might not reach.

But the next step was to replace the Serial I/O of my program for a TCP communication over wifi so the motor controller could be configured and/or commanded wirelessly. So I did some changes and get it more or less working through wifi using telnet program on the computer side. Still some tidying may be needed but it seems to work ok (EEPROM is not working though it gives no error).

If you use the serial terminal on the ESP side, you will see it prints the IP address it obtains once it logs to your wifi network.

For controlling a motor for a dolly you might want to use your cellphone to create a temporary wifi network so you can send the commands to the motor with your desired timing wirelessly no matter where you are (if you build the program for that I will love to have a copy :-)

Windows 10: Upgrade if you can

Since 2000 I am on a Windows-free diet. But that does not mean that I am totally ignoring Windows,
after all, it is what most people use. So I have a few computers still running XP, Windows 7 and Windows 8.1. Last week a couple of my laptops offer me the chance to upgrade to Windows 10.

A few weeks a friend bought himself a nice Bang & Olufsen laptop equipped with Windows 10. My friend is a long-time Windows sufferer and he seemed to be quite happy with the latest Windows version. So I decided to bite and try the upgrade by myself.

My first system was two years old Toshiba laptop with an i5 and 8 GB of RAM. I started the upgrade and everything went smoothly though terribly slow, the whole process taking perhaps ten hours (not sure exactly how long as I went to bed, bored of waiting. And I do not think download speed is to blame here as I have fast Internet connection at home (apparently a bit more than 2 GBytes are downloaded).

My second system was an older, low performance AMD-based HP laptop with 3GB of RAM. The process started smoothly but after one day I could only see a rotating sign below the Windows icon on the screen while zero hard-disk activity was happening.  Tired of waiting after more than 24h I powered cycle the laptop: on booting up the system crashed and I thought I totally screw it up, but on the second reboot the upgrade was able to continue. But apparently only to keep on doing the same. I left it to its own devices for three more days with no apparent change. So I decided to power-cycle it again. At this point I was really lamenting to have attempted the upgrade and I was thinking I might need to reinstall the system. However, I was pleasantly surprised to see a message on the screen saying that Windows was reverting to the previous Windows version. And twenty minutes later the system was brought back to life from the death.  I, for one, have to congratulate Microsoft people decided to put forward this escape route.

I have not explored Windows 10 deep enough to have an informed opinion but so far I am glad the start menu is back.


Testing another brushless motor

For my closed-loop control project I considered brushless motors to be a superior choice but the lack of affordable models in the marketplace let me down a bit.

I was able to find some cheap models on eBay but those were lacking of built-in encoder and my attempt to add them one was a bit of a mess: the optical disk and sensor require better alignment that my poor skills could provide, so it ended up not being reliable. On the other hand, most DIY can get a small part 3D printed and my previous tests with magnetic encoders encourage me to use them more often. So I took some time to tinker with a motor from Nidec and how I could get an encoder attached in a simple way.

The end result is what you can see in the picture below, that just consist of a 3D printed part with three fingers that attach to the back of the motor's plastic cover notches.
You can see in the picture below the hole in the plastic box through which a small plastic part holds the magnet to the motor's shaft (a drop of superglue helped here). A small carrier board in the center of the plastic box keeps the sensor IC close to the shaft's magnet.

One of the unexpected benefits of using a brushless motor is that this one came with a built-in driver, so there is no need of additional electronics besides the loop controller. In this case I keep on using the ESP12E (or NodeMCU) that Mauro Manco kindly provided me a few weeks ago. But this time the part gave me some pain too. It turns out that PWM was not always giving the right output. it is is a software-based PWM and I was getting all the outputs for 8-bit PWM right except the value for 254 that turned out to be the same output as 0. That won't be a bit problem unless your motor's PWM input is inverted, like this motor I am using. Long story short, I had to lower PWM frequency to 10Khz to get it working ok. 

As usual you can get the source code from my dcservo github. And the 3D printed cover.

A couple of ideas for right corners with 20x20 extrusions

Some aluminium extrusions are quite convenient for building various types of structures. Manufacturers usually have a lot of choices when it comes to making unions. However, you not always have the time to wait for a part to be shipped to make a connection. Other times it can be done more cheaply and easily if you can use a drill.

For certain 20x20 profiles, I have used an M6 screw to make right angle joints. The inside hole of the extrusion needs to be tapped and an additional hole will help for tightening the screw with an allen tool:


Other times the profile is so tight that no screw can fit in the inside channel, so then this other approach can be used:


My original CAD had the screws with a distinct color but that was lost in translation :-(

If you clic on the images below you can have a look at the same model in Autodesk A360 Image viewer (unfortunately it only works for a month).


Crome 49 broke PDF viewing in Mavericks

A recent update of Chrome brought me some trouble with various web content, including PDF viewing. Apparently some change in how layers are handled makes the viewing of PDF content almost impossible: you see some bars of the underlying PDF file but only as a flicker while you scroll down the document, as if some black layer was on top of it.

A quick check online revealed that many people using OSX versions before El Capitan were complaing about exactly that same thing.  And while Google seemed not to be offering a solution at the moment (and upgrading to El Capitan was not something I would like to do right now) some users suggested that disabling hardware acceleration in the browser would help.

However, disabling hardware acceleration might solve this issue but create other problems with other content or just degrade browsing performance, so I did not want to go that way either.

Finally, another user suggested the install of a browser extension (in fact replacing Chrome's built-in PDF viewer) for PDF content. I selected the most popular one, called Kami, and not I am capable of watching PDF files again. Not ideal but at least it did not take me forever to get a fix.

And if Chrome engineers are listening, please fix this ASAP as PDF viewing is an integral part of most modern browsers.

Unfortunately, there are some videos from a newspaper that are experiencing the same type of problem, luckily most of them are for advertising so I will not miss them, but I know there are other problems related to the same cause that might become a problem soon.

Update: I have just installed Versión 49.0.2623.108 (64-bit) that fixed the problem.

Software I2C for Arduino

While the Wire library allows you to get I2C working right off the bat with Arduino, there are times when the built-in Wire library does not do it. For some people this happens because they need to do a repeated start condition or to receive a large number of bytes, tasks that seemed to be not possible with Wire library. But for me the problem this time is a bit odd: I had to overcome the limitation of each I2C device to have a different address.

It turns out that I am using a magnetic encoder chip that responds to a given address that cannot be changed. Because I want to be able to access at least two similar encoders from on Arduino board I find myself in the unlikely situation where I have to use two different I2C buses, one per device. However, I2C interface was designed to do the exact opposite thing, allowing several devices to communicate over the same bus (provided each one had a different address of course).

As second detail I have been interested is to speed up the communication, as the current request takes almost 1 millisecond (to read a 16 bit number). It may not seem much but as I wanted to keep a constant frequency of 1Khz on my main loop, that reading time was definitely too long. When using the Wire library I learned that setting TWR=1 will offer me the fastest communication of about 170 microseconds, so that problem was also taken care of. But I still needed to get a I2C second bus running.

There are several Soft I2C libraries for Arduino, but the one that worked for me is the SoftI2CMaster, which I could see is available as simple C library or as C++ class wrapping it all nicely. I settled with the former that hopefully gives me an edge in communication time. It all should had been very simple if somebody told me I should shift left one bit the address value, but because I did not know that, I wasted a couple of hours till I figured that out.

Once set properly, the library allowed me to read one sensor value in 164 microseconds. The code below reads one angle value from the AS5600 sensor using this library.


So now, even if I read two values, one from each sensor, it will take me less that 400 microseconds, leaving room for additional processing while still keeping my 1Khz loop time. Now I only need to figure the same out for other platforms like ESP8266, Nucleo STM32 and MKR1000. 


4xiDraw: Another pen plotter

After watching a video of a new pen plotter made by Evil Mad Scientist we wanted to have a similar device.


And having a 3D printer at hand plus some CAD software like Onshape or Fusion 360 it was a good exercise to design the whole thing.


As usual the process was not completely straightforward, as initially it was more about copying the model we saw but as things were coming together some new ideas were explored. So while the first mock-up was based entirely on laser-cut parts (some of them glued together to make them thicker as the crappy laser I have access to is really depth limited as it is low-power).  Why laser-cut? Well because it was faster (or so it was supposed, but don't get me started on that).


Once the first model was put together several ideas pop up: First, motors are in the way of carriage motion and reduce a bit carriage travel along smooth rods. Second, motors require another part that could be fused with the machine feet and rods support. Third, the initial belt path created non-parallel belt runs that will cause poor accuracy and variable belt tension, so central carriage needs to be revised.

Eventually, the model became more and more made of printed parts and once published there have been more ideas pouring in from some of the readers, like an easier to orient pen holder that already replaced the original one.

Controller firmware

My initial approach was to try to imitate the design and tools of AxiDraw but then I learned they use a PIC-based board that I do not have around and that it will take a while till I get one, but I had Arduinos laying around instead, so it was settled my plotter would be operated by Arduino. A CNCshield a friend gave me away (thanks Ernes) could hold a couple of stepper drivers to control the machine. 

A logical choice was to use GRBL firmware but a few details needed to be solved: this contraption is not a regular cartesian design but it uses a single belt configuration called H-bot. From the math point of view h-bot and corexy work the same so I was happy to learn the latest versions of GRBL do in fact support corexy. That was one thing solved. The next one was that I needed to control a servo por pen-up and pen-down movements. For doing that I learned that robottini's version of GRBL could do that too. So another need was solved too and firmware was settled. You can use mine. Servo is controlled by M3 and M5 commands.

Software workflow

So my drawing machine will receive drawing commands as g-code but, how is that drawing code being created. I looked around and what was designed for AxiDraw was an Inkscape plugin  that would create code suitable for the board they sell which is nothing similar to the g-code mine uses, so I had to use something else. 

I learned about several projects for outputting g-code for laser cutters from Inkscape. I settled with one plugin that seemed very powerful not only cutting but doing raster images too, but intended for a laser cutter. The good thing was that output was g-code, so I had to hack my way to adapt it to draw with a pen. After some struggle I manage to get a stable response. 

The problems I faced were that pen up and pen down commands took time and I needed to add an extra delay so drawing would be ok. Where original plugin controlled the laser output power I just needed to set the pen down so lines would be printed. It took a while but now it is working nicely.


If you wonder why there is a 608 bearing on the pen carriage which is not present in the CAD files it is because it adds a bit more weight so the ball-pen will draw a more consistent line.

Another project  I tested was LaserWeb, which uses your browser to convert SVG or DXF files into GCODE and can stream the file directly to you machine's serial port. It is based on javascript and I installed the server side on Cloud9, but I had to replace the 8000 port to 8080 to get it working on that platform. 

Once the g-code files are obtained, in my case using the Inkscape plugin, another tool is needed to send the file to the drawing machine. I am using a Java-based program called Universal Serial Sender that does the job brilliantly and it includes a preview and a live view of the print too. 

That makes the whole workflow based on open source software that can run on any operating system you are using.

Some of you asked me why the 4xiDraw name: well, AxiDraw is a registered trademark and FreeDraw was already taken too.


SDR-Art

I am working on an Art project that requires some radio-reception capability on a Raspberry Pi. I available online. But given the local nature of the data I need to treat this time I have to use a local receiver.
have used in the past some interesting website that feature an SDR device whose reception is

One suitable device I found very inexpensive are DVB-T USB dongles originally intended for watching Digital TV on a computer. These dongles can be had for less than $10 on eBay. The good thing is that the chipsets employed are Linux supported and there is a bunch of usefulsoftware that can use them as a Software Defined Radio (SDR).

What is SDR? Well, basically it can act as a multipurpose radio scanner for many different purposes as spectrum usage recorder, amateur radio receiver or just listening to FM radio or airplane ADS-B transponders. For that latter purpose there is a cool program called dump1090 that will receive and decode the messages of the airplanes' transponders reaching your receiver.

Hephestos 2 heated bed

Since I got a beta version of Hephestos 2 from BQ before its launch, I have been using that printer more and more. After the initial annoyance about doing things on a certain way (like heating the extruder before performing a home move on an axis) I have got used to these details and I do not care anymore.

And with a few exceptions were a part bottom failed to stick to the bed (nothing that a bit of hairspray could not fix) the printer has been delivering consistently quality prints. Z-axis became a bit noisy on long moves but I have no other complaints.

However,  all the time I have been using PLA or Filaflex on a cold bed. There is no provision for a heated bed add-on so I had a look around for a stand-alone temperature controller.  I have found a simple pcb unit with display that controls a relay for a heating load up to 20A. Not sure how long that relay could last but for less than $5 I am going to give it a try.


Next the bed, I do like aluminium beds with power resistors epoxied to the bottom. In this case care is needed to take advantage of the holes in the bed holder parts so that space could be used by the resistors without losing more than a few millimetres of print height. 


Just for testing I fixed the bed using kapton tape. I was not sure on whether to use the same clamp mechanism used for the standard bed, so I reckon I will use metal bulldog clips on the sides. This new bed being metallic too works ok with the inductive probe used for automatic bed tramming. 


The only other change needed was to adjust the bed offset for the new bed before starting to print. Next PLA printing at 50C worked without any trouble. 


And so did the first sample print I did on ABS. But I have to kill that after a few layers because the bed was wobbling back and forth as only a bit of kapton tape was fixing it to the bed holder.  Next day I will fix the bed properly to the carriage.  

Of course for this bed, equipped with 4 25W power resistors, and disipating around 120W an additional power supply is needed.  I used a 12V 300W power supply I had around. 12V are needed to power the temperature controller and I am using 12V for the heating element too. 

No electrical or logical connection with the Hephestos 2 electronics is needed. Of course that also means that nor the printer nor the host software has a way to switch on or off the bed or of adjusting the temperature. All of this has to be done manually by the user. 


Dropcutter oddities

A while ago I decided to implement the drop-cutter algorithm as part of an ongoing software project. I found very interesting Anders Wallin website and his Opencamlib software. But the project I was working on was java-based.

Once I had a working implementation I realized that while most of the output made sense, there were a few odds points that were clearly wrong.

In a nutshell, the idea of drop-cutter algorithm is that it works by simulating a tool is being dropped till it touches the 3D model whose tool-path we are trying to obtain.  Using such a tool-path on a CNC machine equipped with the same tool, will render a geometrically accurate copy of the model.

The algorithm checks, for each XY tool location, which is the highest Z-axis value that causes a contact point between the tool tip and the object's 3D model. We use a triangular mesh for our models (STL files).  Three types of checks are performed:

  1. Whether the tool tip touches a triangle's vertex.
  2. Whether the tool tip touches a triangle's edge.
  3. Whether the tool tip touches a triangle's facet.
The contact point closer to the top (zmax) is selected for each XY coordinate tested. 


If we represent the obtained 3d coordinates of these points graphically, we should see that tool tip is never penetrating model mesh but would stay tangent to it.

So once you get your data and some of the points seem to be too-low you wonder what may be wrong. If your calculations are right most of the time, is it some rounding error or what?

After banging my head against the wall for a little while, I realized some of the ideas of my implementation were wrong.

Facet test

To determine the contact point of a tool with a triangle I determine the contact point between the plane the triangle is on and the tool axis. If there is not contact we can ignore that triangle safely. If there is a contact, then,  depending of the geometry of the tool tip, calculate the tool height that corresponds to that contact. Now project that tool coordinate back to the triangle, using the triangle normal inverted, is the tool-triangle contact point inside the triangle? If not ignore the calculated tool height.

Unfortunately I discovered that at times the contact point is outside of the triangle face but for a short margin, due to face-to-tool-axis orientation, and if the point is ignored then the tool path produced will severe that triangle with the tool.  The solution I am using so far is to relay a bit the last check while I figure out a more rigorous check.

Edge test

I am not entirely happy with the way I do the edge test. The basic idea is that I calculate the minimum distance from the edge to the tool axis on a top 2d projection. If the distance is larger than tool radius then there is not contact, but if lower then there is contact. What I reckon is incorrect is to assume the contact point matches the vertical of the perpendicular distance on the 2d top projection.

A cheap idea for thermal imaging

Sometimes I needed to check how heat was distributed on a surface. A cool but expensive way is to use a thermographic camera. I do not have one at hand.

But an ongoing project uses thermochromic ink. That is an ink that becomes transparent once a temperature threshold is reached. It goes from a certain color to no color at all. So if you paint a piece of cloth and place it on a given surface you can do the measurement of temperature at each point.

The following pictures show the heating process of a certain aluminium heated bed. My sample cloth was not large enough to cover the whole bet but you get the idea.

 Heat sources start to show as whiter areas. 

 Now heat spreads a bit more.

 Reaching the temperature threshold at many points

For best results a glass on top would make sure the cloth is making contact with the whole surface evenly (top left corner was not having a good contact which explains the apparent colder temperature).

On placing a tag on an area

The common approach I have used in the past for locating a tag on a given 2D shape has been to use the centroid location. For convex parts there is a very good solution. However, when the shape is not convex the centroid location may be outside of the shape surface.


Whenever the tags are intended to identify a shape it might be a problem is the label falls outside of the shape, even more so when multiple shapes are packed together, as user may not be able to be sure which label belongs to which part.

One idea of fixing that is to make sure the tag location is always inside the part, and for that purpose I have evolved through for different algorithms, trying to find the best result.

Algorithm 1

If centroid is within the shape area, then just use that. When it is outside (concave shape) then an horizontal sweep is done in 10% increments, at the centroid height, looking for a spot within the shape area. If that is not found, then same approach is repeated with a vertical sweep at the centroid width too.  It appears as a black box in the video.

Algorithm 2

At the centroid, one horizontal line is traced and shape is explored for the longest area intersection with this line. The middle point of this line is now used for performing a similar sweep but this time done vertically. The tag location will be at the middle point of the longest vertical intersection. It appears a in blue color in the video.

Algorithm 3

Similar to algorithm 2, but adding a second horizontal sweep trying to get a better centered result. It appears as a pink box in the video.

Algorithm 4

It follows a topological approach, looking for the point that it is furthest from the shape perimeters. To do so the shape is painted as a bitmap and a dilate operation is done repeatedly till the last pixels are removed from the image. It is the location of that last pixel the desired tag location. It appears in red color in the video.
Usually, the black box is hiding the centroid that appears as a small circle, but on a few cases that can be seen as the black box is moved away from the centroid.

If you have another way of solving the problem, please let me know in the comments below.

Algorithm 5

Actually, similar to number 4: Instead of using a bitmap, I use the vector representation of the perimeter as a polygon. Then I perform, repeatedly, negative polygon buffer operations [on the larger block] until polygon area reaches a certain threshold. Then I use the centroid of that remaining polygon as the location for the label. It turns out much more efficient than its cousin Algorithm 4 (provided you have a decent polygon offset implementation).


Painless transition to El Capitán

My aging desktop computer is a 2011 iMac. When I bought it I loved the concept that would allow me a clean desktop. Truth be told and not iMac's fault, my desktop is almost always a mess despite de computer form factor.

Since I upgraded it to Snow Leopard (mostly for the nee to use a newer version of Java) I have learned about some SMART error on the hard drive. Once I started to feel the pressure of certain application binaries not running because my system libraries were too old, I wanted to upgrade the system but I could not. OSX install would check the hard disk and it will refuse to upgrade if found defective.

Whatever the problem my 1TB is suffering is not killing it for more than two years. And the iMac being the DIY-unfriendly that it is I keep delaying the hard disk replacing. A few months ago I found a spare USB hard disk at home and I used it to install Mavericks on it (yeah, I am not in a hurry to get next memory-hog upgrade). It all worked nicely while I keep on using the internal hard disk too. But one USB less plus another wall wart left me a bit low on available power sockets.

A few days ago I saw a very good offer for 240GB SSD drive and I bite the bullet. Combined with one ElCheapo USB-SATA adapter I got a nice deal. Maybe it is not a top-of-the-line speed-demon but it copies one and a half gigabytes in less than a minute.

I used an old MacBook Pro to download and install El Capitán on the SSD drive. I like being able to use a USB drive as the system unit, a feature I only see on Macs though it might be available in some modern PC motherboards.

But the beauty of it is that I brought the drive home and then use it to boot up my MacBook Air flawlessly too. But that was not the final stop, I just use it to customize the install, add things like Arduino or Chrome. And now, after plugging it in to the iMac and booting from it (OSX uses Cmd key press while booting up to go to boot drive selection) I am writing this entry finally on the iMac. Of course nothing was needed to use the wireless keyboard or mouse that were needing for boot selection or typing the user password. Definitely a much better experience than if I was dealing with other operating system.

And for those Arduino users that like me still bitch about the weirdness of Windows 8.1 Arduino IDE install (to enable non-signed drivers) nothing of that happens here. I even found a signed driver for CH34x USB serial chips found on many Chinese boards. Maybe I will upgrade other systems if the experience continues being positive. I still need to figure out how to get my pictures and music back.

Useful uses of screen command

Image may be NSFW.
Clik here to view.
Every now and then I am using command-line tools. I work with daily with OSX and Linux and they both have in common the availability of a powerful command line tool.

The same could be said about Windows, but that would be an overstatement, as CMD.EXE provides not the efficiency level that can be achieved with other systems. But even if it could, they chose to make it different.

Anyway, many times I am working over remote terminals on other's computers command line tools and one thing that may not be welcome is for a program to destroyed your temporary data or to just stop working whenever the connection is broken.

If you are using a so-called broadband router you may realize than some remote terminal sessions die for no good reason. (The real reason is that after a few minutes without seeing any traffic through a TCP connection your home router will kill the connection without you knowing it). Let say you are editing a text file on a remote computer through an ssh connection when you get a telephone call that keeps you a few minutes away from the computer and, when you are back, your terminal session dies with an error message. It might mean the changes you did to that file are lost forever. That would be a bad thing.

There is one command that can help here, keeping the text editor program and your session frozen but alive while your ssh connection is destroyed summarily by your broadband router. The screencommand allows you to create a terminal that does not go away when the connection is broken. A terminal session you can safely return to later.

Other usage case that I face from time to time is that I want to launch a program, maybe a long simulation, on a remote computer. If I do not keep the terminal open all the time, the program running on the remote server will be killed by the system. But even if I decide to keep my computer connected, still the connection may be killed by (you are guessing ...) your home router. And the worst thing is the next morning you will not have the results of the simulation and you will need to start from scratch.

Once again, you can connect to the server and start a screen session before starting the simulation, this way you can cancel the remote terminal session at any time with the confidence that your simulation will keep on running till the end. Next morning you can connect again to see the results and, if desired, finish that screen program.

Even better is that screen command is not limited by one terminal per user but you can have as many as you need. And switching from one to the next is as simple as pressing Ctrl+A and next pressing N.

 Yet another scenario is when you launch a program on your office computer (let's say you love simulations and it is just another one). Now that you are home you would like to check the intermediate data the program is printing to the screen but you cannot do that (unless you have some remote desktop software running on your computer).  However, if you started a screen session before launching your program, then that session can be detached from the original terminal and attached the new with the screen -D -r command.

It is a really interesting tool with only on drawback: that you will loose your terminal's scroll mechanish. So now, when you attach to a certain screen instance, you can see the content of the current screen but you cannot scroll back to see the lines that were printed before. Other than that, it is pretty useful.

Buliding a Prusa i3 MK2

I have built (or help others building) quite a few Prusa i3, from sets I sourced myself, including the self-printed parts to commercial kits from bq or Josef Prusa himself. But when I saw the latest i3 version I was surprised about the ingenuity of some its solutions.

Having used kits from Prusa3D before I knew they left no details unattended, so I could understand them charging more than others. We are very happy with the i3 we built from kit so next time we needed to get some printers I had to decide between what I reckon are two good choices: bq's Hephestos 2 or Prusa i3 MK2. H2 has larger bed but it does not have a heated bed. MK2 can do more materials and can print hotter than H2, so we stayed to that.

The kit comes is a box similar to the cardboard box of a mini-tower PC. There are different smaller boxes and plastic bags inside with the assorted components.

 And it comes with its own set of tools (not the red box but the other tools).
 Motors come well protected, as some of them now have a long threaded shaft, plus each motor is identified with the axis name.
 Plus a bag with all the printed parts, any color you want as far as it is orange (there are a few black parts too).
 The power supply comes pre-wired and protected by a plastic part that holds a power switch and a power socket.
 Now let's begin the build. Kit comes with a full-color manual with  pictures and explanations, but you might want to have a computer nearby so you can zoom-in whenever you need a better picture (my sight could be better). Steps are numbered and there is a bag of metal parts and a bag of plastic parts for each step. Just follow the manual and you will be ok.
 Little by little some differences start to appear. And you may even panic. Like when it seems there is something wrong with the new y-axis belt holder, whose screws apparently go through an untapped hole in the y-carriage x-shaped part. And it is then when Prusa3D plays what I think is one of their better assets, they have a chat applet in their website you can use you to get support in real-time. So in case of doubt you can contact them to help you realize there was nothing wrong and that you just missed some detail because MK2 does some things a bit different (there are no tapped holes anymore on y-carriage in case you are wondering).
 Another thing that is differnt is that now z-axis motors come with a built-in threaded shaft.
 X-axis does business as usual but now it includes room for an end-switch and later you will need to add the somehow tricky z-axis nuts.
 Just follow the suggested sequence and your machine will be taking shape.
 Did not I mention candy is part of the kit? What is unclear is what is the best step to use it, as the manual does not mention it nor the bag has a number attached. Anyway, it is a nice touch too, that might even please any little ones you might have around.
 So after three hours of work we were like this.
And one hour later our built was finished. Our biggest mistake was to mount y-carriage the wrong way, so later we could not fix the heated bed to it. One shameful chat later, we realize what we did wrong and fixed it and the build was done.

However, it took us one hour more for setting up the machine. Making sure all was square was easy. Do not forget what the kit does not include but you will need is a ruler, at least 100mm long. Another thing that can be useful to have around is a wire cutter for trimming the many zip-ties you will use. We used the pliers from the kit but those will leave a long-ish piece of material.

Our first print was a PLA batman that failed almost at the end as the model included no heating of the bed, I do not know why.

All in all, I am impressed with the kit.

Eavesdropping your own wifi network

I was recently ask by a friend about how certain P2P wireless cameras can be accessed from a
cellphone with no router configuration. I had no idea about those cameras or its so-called P2P-thing whatever that was that tricked your home router so your camera can be accessed using a mobile app.

Of course if both the wifi camera and the cellphone belong to the same LAN there is a simple answer, but when they belong to different networks and there are one or more routers in between things may get murkier, specially when on or more of these routers are broadband routers (marketing-talk for NAt boxes).

The problem of reaching one host on the Internet from another is:

  1. to figure out its IP address
  2. to be able to connect to it (this is where firewalls may be a problem for your communication)
However, if a device is connected to a home network with Internet access, it is most likely served by one of these broadband routers, that will block any connection attempt that might come from the Internet to any device in the home network. Effectively making impossible to access devices in your home networks to good or bad users on the Internet. 

Of course, there are ways to overcome limitation with virtual-servers port forwarding that will expose certain computers on the home network to be accessed from the Internet. But using such a feature requires configuration changes on the home router. Sometimes you cannot do that or do not know how to do it, so extra help might be needed. If that helps come in human form it may be costly. So manufacturers (Microsoft?) created the Universal Plug-and-play Protocol (or UPnP) that will allow your computer to do the job of changing router configuration for you, cheaper but riskier. Because of that many broadband routers do not enable UPnP by default (or do not even support it).

The tricky part of me discovering how in hell this mobile app was being able to contact the P2P camera required me to install one of these cameras at home and capture network traffic caused by a remote access using my cellphone (with wifi disabled so I could be certain it was in fact a remote access happening through the Internet). 

I have been using Wireshark software for quite a while, and the fact that I know it used to be called Ethereal can give you and idea of how long that while might be. Anyway, Wireshark is a open-source software that can capture network traffic in real-time for later analysis.  

My home network uses WPA2/AES encryption with a pre-shared key (PSK) so you might think that because my computer knows the wifi password, I could capture all wifi traffic on my network. And yes, I could do that, but no, it is not that simple.

WPA(2) protects mobile devices traffic using different keys for different devices on the same network. So even if my computer can capture encrypted network traffic it cannot decode it even if I provide the wifi password because each mobile device would use a different session key (derived from a master key, derived from the wifi password).

But two details will make everything come together: 
  1. you need to capture traffic using monitor mode (that captures not only data frames but also all 802.11 control frames that are usually invisible to user software)
  2. you need to make sure all mobile devices whose traffic you need to decode perform a wireless association (EAPOL) during the traffic capture (this way the software can learn the session key each one is using as is exchanged between the mobile terminal and the router at the beginning of each association).
Ok, so once you have done all that you look at the captured traffic and you feel that I was kidding because it still looks as encrypted as before (but now there are many weird 802.11 control frames too).

Decoding the traffic does not happen while you are capturing data but later. You have to let Wireshark know the wifi password and for that you have go to Edit/Preferences/Protocols/IEEE802.11 and add your wifi password and SSID. In older versions both password and SSID are input in the same textbox and separated by a colon (like in the image below).


Ok, then ... why is not yet decrypted? Well if your capture is not yet decrypted press Ctrl+R for the program to reload the data from the internal buffer, but this time, hopefully you will have the decrypted traffic.

Unfortunately, while I succeeded in eavesdropping multiple devices inside my wifi network, I realized that the the camera was using an unknown encrypted protocol that would connect the camera to a server in China (using UDP so maybe connect is not the best word here). Next the camera would connect to other hosts on the Internet (my guess is these are other similar cameras, therefore the P2P name). 

The mobile application on the cellphone starts by connecting the server and from there it connects to the camera. The "connection" (again using UDP) to the camera works because the camera punches a hole through the broadband router NAT-table (I guess instructed by the server that coordinates them both). 

I contacted the makers of Blue Iris PC software for IP cameras asking if they supported such a protocol and they did not support it. So my guess is that having a similar feature on a PC with more powerful software is not going to be an easy task (given manufacturers give no detail about how the protocol they created works).


G-code over wifi

In the past I tried a Bluetooth link for sending g-code wirelessly to a 3D printer. It works ok but it seems a bit slow so eventually small stops happen while printing (buffer empties). Wifi was an expensive option at the time so I forgot about it.

Recently, the availability of the excellent ESP-link firmware together with NodeMCU/ESP12E boards for less than $5 painted a different scenario and while I was not on an immediate need of it I decided to give it a try during my summer holidays.

That firmware could be used with smaller and cheaper ESP8266 boards but I have found much more convenient to use (as they include their own voltage regulator) the so-called Nodemcu, just $1 more or so. These boards pack a 32bit SoC with 4Mbytes of flash and, lately, they are even supported through the Arduino IDE.

In order to keep the printer still usable through USB connected to a computer I patched Marlin so I could use an additional serial port for the wifi connection. The problem was that I already was using Serial2 for another purpose, so added code for simultaneously handling Serial3. Luckily the modification by TerawattIndustries showed how to add an additional serial port to be used for Bluetooth module. I had used that in the past to add an additional serial port to be used with some new G-code commands over an RS-485 link. This time I repeated the process with a twist, so now g-code is read from both Serial1 and Serial3 and responses are sent back to both ports too. This way no matter whether USB or wifi are the source of g-code the printer will work transparently.


Please note that ESP chip works at 3.3 volts while Arduino Mega works at 5V, so you do not want to connect an Arduino output to an ESP input as it can be destroyed by the excessive voltage. The opposite is no risk (applying 3.3volts to an Arduino input is not a problem and it will be detected as a high level).  You can see in the picture above the circuit and the two data connections (GND is connected if both boards are USB powered by the same computer or power adapter).  A simple 1N4148 (or similar) diode will be ok (as far as the RX input pin pull-up resistor is activated in the ESP chip).

In order not to mess with Marlin, I chose to use the alternate port configuration (RX2/TX2) on the Nodemcu so no boot-up strings would be sent when the wifi adapter is booting up. 

ESP-link configuration web based and I am pleasantly surprised on how well though out is done (the fact that the firmware tells you the new IP of the board once it has logged to another wifi network is just genius!!). 

Once you know the IP address of the wifi adapter (that now is connected to Marlin's Serial3 port) you can send g-code to it easily. Port 23 is the one used by default, but sending data cannot be done with command line tools like netcat as we need to have some flow control (i.e. not to send a new command if the previous one is not yet done). For each successful command, Marlin sends back an "ok" response. So I wrote a small program to send data to my wifi 3D printer.  


 Now I can chose to use the USB port or send data over wifi. More freedom to locate the printer not necessarily tied to a USB port.


Stepper-motor speed profile generation

My 4xiDraw project has been a source of inspiration for other projects. A while ago I mentioned how to add wireless connectivity to a serial-based device, but for I subject I teach I wanted to get a bit deeeper on the details about stepper motor timing generation for trapezoidal (or any other) speed profile.

While this functionality is implemented in every CNC or 3D printer controller software, most of them are based on GRBL development, which is efficient but not easy to grasp on a first look. There are many different but related algorithms working together there.

Just by chance I bought a Wemos D1 board that replaces the Arduino UNO Atmega 328 by an ESP8266 but keeps the UNO form factor. It was a weird proposal but I bought anyway as we all know that anything that stamps wifi on it makes it a better product.

I have used the ESP8266 in the past, through the Arduino IDE, but I have never needed to achieve any realtime operation. But once I checked that CNCshield board could be used (and it will work ok) together with Wemos D1, I set my mind to replace the Arduino UNO of my 4xiDraw by the wifi-enabled Wemos sibling.

The good news was that the ESP8266 32 bit processor and generous flash memory space will allow me to get decent performance without much effort on my part while coding. However, I was not so sure about getting good real-time performance on the stepper's step signal.

Timing is everything

Steppers are picky motors. They do not rotate unless the controller keeps sending step signals at the proper pace. Using a fixed rate is the simple alternative, but physics get in the way and this approach is somehow limited. So instead of using a fixed speed, a more common approach is to use a variable speed, starting from a low speed and ramping up to a cruise speed to later decelerate back to a stop. 

Given that the speed of a stepper is directly proportional to the rate of the step signal, we need to create a signal whose rate will increase [linearly] and decrease. But for coding purposes, we need to establish the time period in-between the different steps. 

Unfortunately, given the reverse nature of frequency and period, a linear increase in frequency (speed) does not translate into a linear decrease of the period. Failing to make this point, programmers are in for a big disappointment. 


There is a very interesting application note by ATMEL that goes into a lot of detail on how you can calculate such timer intervals without much computing cost. This is what GRBL and Marlin and Smoothieware do. 

But for a 3D printing or CNC machine we are interested on accurately controlling the position of each move too. That means that for each basic movement, a straight line is drawn from an initial point to a destination point on a multidimensional space. A certain distance to be covered over an axis comes immediately to a given number of steps. It is that total distance what will be traversed using a so called trapezoidal speed pattern that will smooth acceleration and deceleration phases so hopefully motion will happen without missing any steps. This helps the motors to reach much higher speeds than what would be possible when using only a fixed speed, which will contribute to lower 3D printing or machining times too.  

For a stepper motor, the zero speed corresponds to an infinity period in-between steps. We would consider a non-zero initial speed, than will give us a value T0. This value will be decreasing at each step while accelerating and it will remain the same while motor cruises to start increasing again to slow down the stepper till it stops when no more pulses are provided to the step signal of the motor driver.

The time to cover the distance of a step can be formulated as T0 = sqrt ( 2 / accel ) and the period difference between one step n and step n+1 can be expressed as Tn+1 = Tn * ( sqrt( n + 1 ) - sqrt( n ) ). So we could use that for iteratively calculate the new time interval till the next step. Unfortunately, a couple of square roots take time to calculate, even more if using an 8-bit processor. 

Luckily, a series expansion of the expression above allows us to obtain a simpler relationship that can be easily calculated so now Tn = Tn-1 - 2 * Tn-1 / ( 4 * n  + 1 )

Each step there is a slight speed increase, so when the desired maximum speed is reached, no more increases happen. So that last Tn value is kept for the period of all the steps while cruising until the deceleration phase starts, that can use the same sequence of numbers (1..n) but now these will be negative numbers going from -n to -1. 

What is left is to determine the amount of pulses for the acceleration and deceleration phases. For simplicity I considered the same acceleration for both of them, so they will need the same amount of steps. The remaining steps, if any, will be traveled at the maximum speed. Please note that for short movements it may not be possible to reach the desired maximum speed (feedrate) so half of the time will be used accelerating and half of the time decelerating to/from a speed lower than the maximum one. 

Timer0 on ESP

One thing I have not used before was a timer on the ESP. I assumed the Servo library would use one but I did not dig into the details. However, now I wanted to make sure the timing I was carefully calculating for each step would not be disturbed by other tasks the processor might get into when communicating wirelessly. 

My plan was to use a timer so each new step will be scheduled with the help of the timer, that will cause an interrupt at the right time of the next step. Being interrupt-driven should help getting the timing right.

Once configured a new call to timer0_write(ESP.getCycleCount() + 80 * microseconds) will schedule a new interrupt after that number of microseconds from now.  The code of the interrupt will calculated and schedule the time on the new interrupt, plus it will perform the motion on any of the steppers, determining the end of acceleration, the begin of the deceleration or the end of the move.

However, I have found I cannot stop the timer0 from running without getting a watchdog interrupt afterwards, so I depend on whether or not there are more steps to be processed to run the motion related code or a dummy new interrupt is scheduled every 10 milliseconds, just to keep the ball rolling and avoid the watchdog from complaining. Maybe there is a better way but I settled with what worked first. 

The servo

I only needed to get a servo working, so the obvious choice was to use the servo library, but for reasons unknown, it won't work. Not even when defining SERVO_EXCLUDE_TIMER0 to prevent it to use timer0. But that is not really a big deal as I can use some time in the main loop to create a pulse of the desired width (1.5 .. 2 msec) and to refreshed it every 20 msec or so. And so I did and it seems to be working nicely as shown in the sample video below:

The code that was driving the motion was being created in my desktop computer by this line of code:  (while true; do X=$((RANDOM % 100)); Y=$((RANDOM %100)); Z=$((RANDOM % 1000 + 1000)); echo "M3S$Z"; echo "G1 X$X Y$Y"; sleep 2; done ) |nc -u 192.168.4.1 9999

You can get the project code and some extra details, like a logic-analyzer trace and source code from here. Almost forgot: I have based my project on Dan's code from MarginalClever.com

Viewing all 217 articles
Browse latest View live