Quantcast
Channel: Fighting with computers
Viewing all 217 articles
Browse latest View live

Moshidraw: pain on every laser cut

$
0
0
I have been using a [cheap] laser cutter machine. You can see which one on the following video.


Till now it kind of works but what is really annoying is the software you have to use to be able to cut and engrave. It is called Moshidraw and for reasons I cannot really understand it comes with a USB dongle for protection (it will not run without it).  Not in a million years I would like to copy such a program.

This is what I have learned so far that causes trouble:

  • If you DXF file contains curves, the operation will fail randomly (suddenly the cut will take an unexpected route and it will ruin your stock material).
  • If you import a DXF and fail to select the part, the cut will did not work properly.
  • If you have several parts in DXF, it may fail at any point (mostly when it is almost finished and all your stock material will be ruined). Best results and lower risk if you do multiple parts one at a time.
  • There not seem to be a way to force inside cuts first, so some operations will fail as the outside is cut before the inside so the part will fall and inside cut did not happen (only solution I have found is to reduce the power, doing multiple passes and keeping some of the contour to be cut till.
  • Sometimes it will cut a line in the middle of the design for no reason. If you are lucky the Optimize Route option will avoid that to happen but that is not a sure bet.
  • It will never remember you want to do a outline cut or that you do not want a mirror image of the cut.  At least it will remember the offset you fixed.
  • Do not attempt to repeat a cut without closing and opening again the cut dialog or the second one could fail. (Don't you love it?).
Other than that and the ridiculously small area of the stock material holder it is a fine machine if you have the patient not to destroy it every time you found out one of the many evil sides of the software/firmware that controls it.

It is easy to see why many people will completely replace the controller board right away.

One Arduino controlling two brushless DC motors

$
0
0
After some changes I have been able to get it working reliably with two motors. But one of the changes I have made is to use a new type of motors that I reckon are better suited to the task. Instead of using brushed motors that are cheaper, I have found these other brushless motors that have several advantages: 
  1. Being brushless there is no other wear than the bearings
  2. They have built-in driving electronics, so they can be controlled with the Arduino digital outputs, that simplifies things and reduces interface cost. 
  3. Motors have built-in encoder disk too, but the one they carry is just 100 lines per revolution (a bit poor in my opinion) that can turn into 400 "steps" per revolution with the 4x decoding of the program. The lower number of lines per revolution puts less stress on the Arduino interrupt code, which may be one of the reasons it works ok now.
  4. I have moved all the encoder signals to pins that are monitored with the interrupt on pin change and I have reserved the two external interrupts for the STEP input signals for each motor. 
Though I am doing my tests with an Arduino UNO, it has to work the same with the Pro Mini (as far as it uses a '328 chip too). 

The motors I am using seem to be manufactured for Ricoh, but I have failed so far to obtain any decent technical information. But they are sold as 20W brushless motors with built-in driver electronics and quadrature encoder.


While they cost around $15 each, these motors have a brilliant behavior, even when powered at 12V (they are rated 24V).  With power to spare I have to reduce the PID maximum output if I do not want my toothed pulleys to skip in the highest acceleration moves of my tests. The video below shows X and Y axis motion while printing a part controlled with Marlin firmware running on the blue Mega board while the red Arduino UNO board runs this code.

Some other interesting detail is that motor electronics will work at 3.3V too, in case you are driving it from a 3V3 processor. But remember output shaft is 6mm and not 5mm which is a bit of a pain.

Getting more data from your PID controller

$
0
0
Just knowing the steady-state error of your controller may not be enough for you to figure out how well your manual adjustment for your PID gains is working. In order to get a better picture of it you need to gather information while the loop is reacting to an input change. 

However, just sending back information over the serial port while the loop is working may alter the very timing of things within the loop. So what I have done is to delay the monitoring information transfer till the loop reaches the steady state. That means actual position is recorded every millisecond and stored in an array so it is later transmitted once the motion is performed. Thanks to that I can see the system response quite nicely whether the response does have an overshoot or it is dampened properly enough. It really comes in handy when trying to set the P, I and D gains by hand. 

The problem, however is that for doing this you need to have enough RAM memory and Arduino UNO is a bit short of it. What I did was to use the same Arduino code with a more powerful Maple Mini that comes with 20K of RAM so I could record the system evolution every millisecond to transfer it at a later time.


Rookie mistake with Makercam

$
0
0
This morning I was in the lab of a digital manufacturing subject and I showed my students how they could do simple designs and turn them into a 2D manufacturing g-code without installing any software in their computers or tablets.

I did show them the terrific OnShape.com online service that I have found very easy to learn and yet very powerful 3D design package. I performed a simple design.

And later I showed how that could be exported as a DXF file and with the help of Inkscape it was written into a SVG file that Makercam.com online CAM software can handle.

I selected metric units (though I would expected MM instead of CM but I guess it is ok for grid size purposes) and I proceeded to show the different machining operations available and how we will be cutting the thing.

So minutes later we have g-code file ready to be loaded into our CNC router equipped with LinuxCNC software. After setting the whole thing up the process started and seemed to be working ok, though I had the impression it was larger than expected. But I let the machine to work till the cut was done (I missed to have had some tabs for the outer profile operation as the parted was freed and got a scar in the process).

But when I did performed a measurement of the part it was clear something went wrong as it was just too large in both X and Y axis. But I remember I had been careful with Inkscape to avoid any problem with the part's scale.

Little by little I walk back and forth all the steps to find where the error was introduced and it was soon clear makercam was to blame. I just imported the file into makercam and it was the wrong size, just large. But then I said to myself, how come this program is so wrong and yet many people seem to use it happily.

So after some googling I realized where the culprit was: Though makercam use SVG file format for importing designs, it seems it needs some additional guidance to set the right scale, in the dpi box of the preferences. Those like me using Inkscape have to set that to 90 dpi. It was set to 72 and that was the reason the part scale was off. Now I have the right part but at the wrong scale :-)

Getting the hang of it

$
0
0
I have been using for a couple of weeks the web-based CAD system OnShape. I did this robot just as test to see how to use the different tools.

I have been using OpenSCAD for quite some time and I was not very keen on using some fancy CAD systems like Inventor or Solid Works because I could not afford them but also because they would force me to use Windows, which I prefer not to. But even if AutoCAD can do OSX besides Windows, I do use Linux most of the time.

So when I learned that there was a new game in town that was based I was first skeptical that a browser could to the job, but after some testing I am now a believer. And I love to be able to jump from a Linux workstation to a Mac to continue editing my designs.

The free version of the service has certain limitations in the number of private projects you can have, storage and something else, but given the fact that can not only import but it exports to popular CAD formats like STEP or IGES it means your work is not locked in. And the easy export to STL makes it perfect for 3D printing (it can also export 2D sketches to DXF equally easily for laser cutting parts too).

I am by no means a CAD expert so maybe some important features are missing but it seems these guys really are experts in the field. If you liked Gmail, I would say this tool is to CAD what Gmail is to email.

Making sense of toolpaths

$
0
0
On my CAM project I am using the intersection of a part with a given plane to determine later the proper tool-path for three-axis machining. But sometimes, parts are such that the intersection line contains some concavity.


So I detect whenever the tool cannot reach that line and create a suitable solution. In the picture the red line in the top removes any concavity as seen from Z-axis top, converting that polyline into another that might be machined from the top.

It is interesting to note that one extra point needed to be created and appears marked with a dashed circle, though strictly speaking both bottom corners of the red line are new points too, but they are not over any of the original polyline space.

A second problem appeared once I obtained not one polyline but several of them as a result of objects that contain holes or several domains with respect to the cutting plane as it is shown in the image below.


In this other case, the different polylines need to be consolidated into a single one, that will ignore the holes (as the gray one) contained within another area and that will join the polylines that can be joined (which may or may not be possible depending on whether or not they overlap in the sweep direction). Again the red line will be the result of combining the three different polylines above.

Decoding barcodes from scanned pages

$
0
0
A while ago I created a tool that would send the marked exams to my students by email. I used adhesive stickers with a QR barcode they put in the first exam page once they are done. The system kind of works and even some colleagues have started using it too. The problem is that once we have the pile of marked exams scanned as a single PDF file, barcodes need to be read reliably.


It is not that the scanned images are bad. I usually scanned it at 200dpi grayscale. The problem is that even if I set the black to the strongest setting is not good enough for ZXing library to decode it properly. And of course if the code is not decoded properly all the system goes under.

For a while I have been cranking up the black color using Imagemagick command line tool and when that was not good enough I realized that blurring the document would also helped. While I get that working, the exam itself became not so nice to read after that.

Anyway, after a bit more of testing I realized that the slight imperfections on the dark areas of the barcode seemed to be the cause of not being recognized properly, so I did a quick test with The GIMP to see if Erode operator would help here.

Erode will use a mask around pixels that will keep the blackest neighboring pixel, effectively eroding white pixels, mostly those surrounded by darker pixels. A blur operation later would make the result even better for much more reliable recognition.
So the question was now to just do this in an automated way. As I was already using ImageMagick I googled to see if that feature was available in it. But several posts on different forums suggested it was not possible.

So the next few hours I fought with The GIMP command line mode. It is there, it can be used, but I am embarrassed to say I kind of gave up as I failed to see how I could do that quickly and easily; after all I just wanted to use a couple of options of the filter options (erode and later blur using default parameters). Some examples I found online did not work at all with 2.8 version, maybe something has changed since they were written. Finally I decided that it might just be easier to code that in Java.

But just by chance, I discovered that what new versions of ImageMagick call Morphology Methods do, in fact, include an erode operation. So finally it is all good and I get a, hopefully, reliable barcode decoding.

Importing OpenSCAD designs into Onshape

$
0
0
After using Onshape CAD software for a while I am really fond of it. So one natural thing to do, specially once they have released the Instructor's kit is to start using it in the classroom too. But one thing I was not so sure how to do was to use old designs I made using OpenSCAD.

It does not mean I am completely quitting using OpenSCAD but suddenly I can see I can do assemblies in Onshape that will look quite nice for showing and documentation purposes if only I could easily import from OpenSCAD.

I am glad to report that the route OpenSCAD --> FreeCAD --> Onshape worked brilliantly. Even more when a few tricks were applied. While some people suggest to import CSG files from OpenSCAD to FreeCAD, I have had more success by directly importing SCAD files into FreeCAD. One trick that worked well for me was to get rid of $fn references, so now circles become real circles (or cylinders) in FreeCAD.


If a part keeps some $fn references then your cylinders or circles will keep the desired number of facets, which may be the desired intent in some cases.

This workflow: import .scad file in FreeCAD and export it from there as .step file will create a STEP file that Onshape will happily import into a part studio with no further intervention on your side. 

Once this process is done with all your parts you can easily create an assembly of your machine in Onshape, including rotating and sliding mates that will allow you see your mechanism in motion.

Minimizing tool air-time

$
0
0
For a CAM software I wrote, intended for milling foam sheets, I needed a way to improve machining time, so once the feed rates are raised to the limit, the next step is to reduce any wasted time.

On an initial approach, our tool was finishing parts one after the other, so there was a bit of the tool going back and forth within the same part. While it may seem the whole problem is like a big TSP (travelling salesman problem) and the way to optimize the used time is to connect all the dots with the shortest possible path, it is not exactly so.

On a milling operation, the tool path has been carefully calculated so it will remove the proper amount of material by following a certain path. Changing such a path will alter the finish of the part and we do not want to go there.


So what we really have is something like two different sets of movements, one that corresponds to the actual cutting operations and a second one that moves the tool over the air to start a new cutting operation. It is that latter set of movements that can be approached as a TSP without affecting the quality of the CAM output.

Many CAM operations require removing material as a sequence of steps or layers, the order of each layer needs to be preserved as explained here.

But I am lucky our process just go straight to the finishing pass as the tool can machine the whole stock depth in just a single pass (don't try this at home).

So what I have done is to rearrange the different movements between each milling pass so the total distance is minimized (though I am just using the simple 2-opt heuristic that most likely won't lead to the best solution but to an acceptable one).


I have got the idea from the StippleGen2 software I downloaded from Evil Mad Scientist Laboratories blog.

The lines in red correspond to the actual milling operations and are not changed and the grey lines represent the ones that we are trying to minimize but carefully rearranging them.

Closed-loop motor control for 3D printers

$
0
0
It is been a while since I brought this topic in my blog. I recently bumped into this thread on element14 about the same topic too.

I was naive enough to assume that what shows up on eBay or Aliexpress can be available for quite a long time. It appears that some the units just pop up for a while to never be seen again. That has been the case with some of the motors I have been doing tests with.

Since I realized that steppers could in fact be replaced in our 3D printers by a closed-loop DC motor I have been tinkering. One of the key ideas was to find a steady supply of motors that would enable anyone interested into building the same contraption. And while the brushed motors I used worked as expected and were cheap enough, they seemed a bit too weak (not enough torque for higher accelerations) and I was quite worried about how long they will last.

On one hand there is the argument that if inket printers replaced steppers by closed-loop brushed DC motors, we could do the same and get away with it. After all, how many of you have needed to replaced a DC motor on any of your inkjet printers because their brushes were wear out? However, if you have a look at how inkjet printers work you will notice not much in common to how 3D printers (I mean FDM ones) work.

An inkjet carriage moves from side to side of the paper at a [constant] speed while the readings of the optical stripe help the processor to trigger the inkjets to spite ink at the right spots.  Each movement comprises the whole paper width and takes a few hundred milliseconds. Therefore there is one or two full cycles (start-coast-stop) per second while the printer is active. Each start/stop operation will require the motor to receive/deliver a significant amount of current for a few instants while motor is accelerated (or decelerated). It is these high-current operations what will put more stress on motor brushes.

On the other hand, a 3D printer moves each axis by tiny bits whenever a part is being printed. Each movement will required the motor to accelerate and decelerate (sometimes till reaching a full stop) before the next movement takes place. Each one of this little movements can take as tens of milliseconds or more and usually they are fused in such a way that carriages do not need to fully stop between them. But that means the closed-loop position control is putting several tens of start/stop operations per second on the motors. If we use similar brushed motors as the ones present in inkjet printers, it is expected to see their lifetime to be definitely much shorter in this new role.

Therefore, I decided that most RepRappers will be disappointed with a "new" closed-loop DC motor if it only lasts for a few months before motors had to be replaced. Specially when stepper motors usually last forever (or almost, in most systems). Steppers do not have brushes, so unless severely overheated it is the lifetime of the bearings what limits its service life.  If we use brushless DC motors instead of brushed ones, we can get a similar lifetime as stepper motors.  However, brushless motors are usually more expensive and they need more complex electronic drives.

I found several models that could work and while not ideal, they were more than powerful enough. Unfortunately, just a few weeks after I bought some samples they became unavailable. Still I was kind o happy with the results but realized no other people could use the same solution as the model could not be obtained anymore.


I contacted some manufacturers, most notably Nidec, which has some very interesting units, but the company seemed not to have any interested on talking to me (I guess their business is good enough to turn down sales of tens of units per month, as that was the projected sales figure in my request).  Other manufacturer had very nice motor prices but above $60 which looked to me a difficult pill to swallow.  Maxxon can create custom motors to fit all you needs but you may be willing to pay their price.

I had more luck talking to smaller companies so I settled with a Taiwanese motor manufacturer that was brave enough to explore this application space with me. So as you read this a sample brushless motor is being develop and the goal is for it to be able to replace at least X and Y axis in RepRap 3D printers while it can be directly plugged in to regular electronics (you remove the Pololu and plug the motor cables in).  A setup process will be needed before we can obtain the most of the new motor, though we will try to have an initial configuration that may allow most people to skip setup process.

Working together with a manufacturer, cost has been all the time a priority, as I want this to be available at an affordable price. After all, you can do this right now if you buy a brushless motor and a driver electronics that could accept step and direction inputs.  The problem is these available solutions will easily cost $150 per axis or more. You can buy ten steppers and their driver electronics for that price, so to me that is not a choice and I do not see any conversion to happen at that price range.

I have moved away from optical encoders and I am currently testing magnetic encoders that hopefully will give us a higher angular resolution (12 bits) at a lower cost. More on this once we have a working unit.

Using a tablet to control a CNC machine

$
0
0
I do have some CNC routers using Arduino Mega and Marlin as pulse generators and g-code interpreters. Usually they are connected to a computer for selecting and streaming g-code files to the machine.

Lately I was testing a new machine and I found an old Android tablet laying around, so I wondered if it could be used for the task of controlling the machine. I am aware of programs like Octoprint that can do exactly that using a RaspberryPi and I have seen it does a great job. However, unless some more hardware is added to the mix, no display or user input is possible. But a tablet already has the display and touch screen that can be used for that purpose, plus Wifi and Bluetooth for wireless communication. What was needed was a USB connection but for that a cheap OTG USB cable was all that I needed.

Well, once the hardware side is solved, you need some software and after checking and testing different options I ended up with GcodePrintr. A software that is designed for controlling a 3D printer that will do a nice graphical representation of the printing commands too.

The best thing is that though the program is not free, there is a version called GCodeSimulator that allows you to test your setup but will not send a g-code file to the printer (or CNC).

So I bought the program and it all seems to be working as expected even though the size of my "bed" is much larger than the graphical presentation allows, but that is not a big deal for me.

Have a look at some moves streamed from the tablet:


Basic 2D CNC milling workflow

$
0
0
I needed for a project some metal holder plates for nema 23 motors. As I have in the lab a Chinese 6040Z CNC router I thought it will be an easy thing to do. Oh boy, how wrong I was. 

They project was a simple plate (very easy to sketch using OnShape).

Once it was sketched a 3D part could be created by simply extruding it, which may come in handy if some drawing assembly needs to be done for documentation purposes.
However, for 2D projects a 3D model of the part is not really needed for the process of creating 2D machining code. There are different solutions out there that are free, but one that I like because it is very simple to use and it is on-line is makercam.com but for that you will need an SVG file instead of the DXF that OnShape can easily produce. 

I usually use Inkscape software for converting to and from SVG and DXF. I did so in this case and it work as expected.

So, once I have got the SVG file I can feed Makercam.com I need not to forget to change the default dpi value from 72 to 90 otherwise my part scale would be wrong. You need to select each line to decide which machining operation you need to perform. For this part I chose inside profile operations for all the holes and one outside profile operation for the outer profile of the part (it is important that one is done at the end, other wise your part will be cut loose and you will be in trouble with the rest of the machining until figure out a way to keep the part still).


With the profiles select you perform the desired operations and eventually generate on or more machining (g-code format) files.  These will represent all the different movements of the cutting tool. Here you specify the height of the stock material and the depth of every cutting action. You will specify the feed-rate for cutting and non-cutting moves too.


Finally, using some software to send the g-code to your CNC machine you command the cutting tool to do exactly what the CAM software planned and, if you are lucky, you will obtain the desired part out of your stock material. In my case I was using aluminium and a CNC machine controlled by LinuxCNC software. 

Unfortunately it was a no go, as something in the computer would make the x-axis motor to stop working every now and then (I was told maybe the BIOS setting of the port was wrong, but I gave up and use another computer).

Second computer was using Windows and Mach3 software and though it gave me some trouble with the larger holes (where my tool would be caught and x-axis would lose steps, but somehow I managed to fix it on the fly).  But at the end I finished the parts with some sense of achievement.


Even when the parts were finished from the CNC machine some other manual processing was still pending like taping some holes and filing the edges. But all in all, it was a good experience.


How to do a CNC milling farm.

$
0
0
One of my current projects requires to run two, maybe more in the near future, DIY CNC machines. Machine controller is USB-based and a PC could be used to send g-code to machine controller.
However, we have tried a different approach that proved successful: using a cheap tablet instead of a PC.

It all started by testing the excellent program GCodePrintr by Mathias Dietz. This software is designed so people can use a 3D printer directly from a tablet. You can stream a g-code file for printing to the printer plus you can do all the usual manual functions of moving the axis around. Besides, a graphical simulation of the print is represented on the display. And in the few tests I did, printing speed did not seemed to be compromised because the lower tablet performance (compared to a PC).

However, uploading a file from Dropbox or using some FTP app for sending g-code files to the tablet was not very convenient as required user time spent at the tablet. But one feature of GCodePrintr came to the rescue: There is a Network Receive feature you can use to send a g-code file to the app. It needs to be enabled in the program configuration and it uses TCP port 53232. Once that feature is enabled you can send your file to the app and in a few seconds it can be received via wifi.

That was almost all we needed. However, the app will show a dialog box after receiving a file from the network asking the user whether they want to start streaming the file to the printer right away. That was a problem because still some user action was needed at each tablet. I suggested the developer that a welcome feature would be to add some special data to g-code file so the user intervention could be removed at will. Fortunately for me, that was something it was already taken care of in the software. I just needed to send some magic bytes before my g-code file for triggering the automatic start feature (now without user intervention).

So what was left was to create a simple way for the operator to send files to our two machines. Operator was using a Windows computer (not my choice though). So I created a couple of bat files on the desktop in such a way that operator will drop the desired g-code file on the desired machine's .bat file (named after the machine).

What each .bat file does is to send the file contents using ncat software (netcat did not work reliably for us) and it inserts a new record in a sqlite3 database to keep track of each one of the files being processed for accounting purposes.

So now the operator just replaces the stock material on each machine and drags a new file onto the machine icon to get a new job started. Database registers the start time-stamp of each job so a good estimate of each job duration can be obtained.

Initially the program, being designed for 3D printing, did not allow "bed" sizes large enough for our needs nor it will properly draw G0/G1 non-extruding moves. However all this has been fixed as the developer has been very receptive to these suggestions for this new use case of the app.

A similar solution could have been done using Raspberry Pi using Octoprint but without an additional keyboard and local display the manual operations, when needed, could not easily be done locally.

Please note that a 3D printing farm could use the exact same approach, just connecting a 3D printer to the OTG USB adapter of each tablet.

Happy g-code streaming!

More on DC motor "stepper emulation"

$
0
0
The code I developed a while ago for using a DC motor (or a BLDC) to replace a stepper has got quite an interest among youmagine users. Over time I realized that some of the quick and dirty things I did were preventing the easy exploration of system parameters for users. Using different PID parameters required a recompile and of the sketch.

I recently received a Printrbot Simple from Brook Drum with the goal of testing with that printer my closed-loop solution.  As usual, simple things (in theory) become tougher that initially expected. First of all, it took forever for the printer to clear through customs and while Printrbot provided and shipped the printer for free, the taxman wanted its cut no matter what, and it took more than too weeks for that to be worked out.

We settled on the Simple because it had more room for the motors to fit in though carriages might be heavier than the Play.


At the time I did not know the CAD of both models was available on Youmagine, so I only had a vague idea of the potential problems of fitting the DC motors I was planning to use on each model.

Once I downloaded the Simple CAD model and imported into Onshape I was able to redesign one of the plates so it will fit the DC motor instead of the stepper.
That part will help attaching the motor to Y-axis of the Simple but there was no may I can make that while I keep Z-axis threaded rod in place. They do that with the stepper because it has a long shaft but that is not the case with the DC motor I am using. Ok, time to think about it. Maybe I will use some fishing line and a couple of pulleys to have a crane-like Z-axis. For now, let's focus on the drive. While the original part was made of metal, I though I will save some time just 3D printing that part. On hindsight that was not a wise move as the plastic part does not help motor heat to spread to the rest of the metal body, so heat becomes a problem. 

I knew that the axis was heavy so the first test was to determine whether or not the motor could handle the load. I learned that 12V might be a bit on the low torque side but a few more volts in the supply voltage will make the same tiny motor to get much more authority. Same driver electronic could do with a higher voltage so no big deal.

Next problem was to replace the axis belt as unfortunately my motor came with MXL pulley. I managed to get an acceptable setup, but due to my pulley lacking a belt guide I later needed to add a big washer to one of the bearings so the belt could not derail on fast moves.

But once everything was up and running I realized how inconvenient was to need a recompile every time I wanted to test a new set of PID parameters. So what I did was to include some additional serial commands so I could set parameters on-the-fly using the serial port. 

And then, I realized that once you have set the right set of values, it will be great if you can save them so they are not lost when you power cycle the controller. EEPROM was the logical choice and after a bit of fiddling with the EEPROM library (as I have an old iMac I cannot update due to a SMART harddisk error, which forces me to still using an old Arduino IDE) I get the thing working nicely.

Not only you can select P, I and D values, but you can also check current encoder value, output value and target location, command manual moves or set a sequence of random moves, plus you can store current parameters into Arduino EEPROM so next time you power it on it will remember them. 

While all previous code was just uploaded to youmagine, this time I created a github repository so hopefully that will make collaborators life easier.

Meanwhile I still need to figure out how to get another DC motor to X-axis.


First impressions on bq's Hephestos 2

$
0
0
I was asked to be a beta-tester of this new machine sold in kit form by Spanish firm bq.  It's a bit hard to keep the experience to myself while the testing was taking place. I won't say it is great and rosy but their approach was a bold one and I think it stands out of the crowd.

So what is it?

Hephestos 2 is a 3D printer kit to be assembled by the user. While it might find its routes in Josef Prusa iteration 3 model, this time it is just a faded image. That was entirely the case with the former Hephestos that shared most of Prusa i3 features with a few of exceptions: no heated bed, a couple of cable chains and a very well engineered extruder/hotend combo.

But the Hephestos 2 breaks with the Reprap tradition and includes no printed parts and a body made of powder colored folded metal parts. Only Y-axis uses 8mm diameter smooth rods and linear bearings but Z and X-axis use miniature Hiwin linear rails for extra accuracy. A new electronics board integrates an ATmega 2560 plus five DRV8825 drivers with electronic current control (no potentiometers to fiddle with) and a large LCD monochrome graphic display that enables autonomous printing off an SD card.

Not having a heated bed keeps the power supply requirements low so a brick type power supply comes with the kit. By the way, the bed is A4 size (297x210mm) and max print height is said to be 220mm (I haven't printed parts that tall).

Firmware is based on Marlin and source code should be available and it uses a custom-developed inductive bed sensor for automatic bed calibration (tramming).

How it works?

The machine prints PLA very nicely at 40mm/s and Filaflex at 25mm/s. Both speeds can be increased by a fair amount and still get decent prints. The machine insists on doing things its own way so those of you with another printer may wonder why homing requires heating up the nozzle, but these are minor details (that are in fact done for a reason). 

Printing quality has been great in my opinion but what captured my attention mostly was the extruder/hotend combo that is even better than the former Hephestos, now with a dual hobbed gear (a la Bondtech, but direct drive). 

Printer is not noisy but at  a point extruder fans are.

There are some quirks in the beta firmware that made the time between prints not not very reliable, but once a part started printing it always finished ok. I have been using hairspray on the glass bed with great results, but I have not attempted parts with are really large base. I would prefer to have a choice of heating up the bed but I have got excellent results with the cold bed.

What about the build process?

Let me start by saying that my build was a bit of a mess because it started before the manual was available, so I made a few wrong guesses that I needed to undo later in the build. I have been told a trained person can do it in less than two hours (and this has been shown in the product presentation) but I would say it can be done in a morning or evening by one person, though it is always better if you get some help (I was lucky my friend Ruben helped me out and despite all my mistakes the printer was finished in less than four hours). 

I cannot elaborate on the final user manual but the document I used was very detailed so I guess people would have no trouble building the printer. 

The electronics is well thought out and using a combination of color coded calbles and different types of sockets we got a working printer at the first attempt (almost, I messed up the z-probe, but that was again my mistake). 

I just loved the fact all the wires were already inserted into the cable chains. The bed is held by two quick-fit levers (getting them into the threads was most likely the more difficult part of the build).

Conclusion

I will not doubt for a second to name the Hephestos 2 a quantum leap from its predecessor. It feels solid, it looks good and, specially, it prints beautifully. 

Bed is large and that allows large objects to be printed but it means more mass is moving too, and it is not light, so the machine will not be a speed demon. The printer looks good and has a clean design, electronics uses no fan and it can print from SD or from USB. 

Unfortunately I have not been able to use it with Pronterface or Slic3r but used Cura instead that was the manufacturer's software of choice. I tried not to create more noise during the beta testing of the firmware but I hope the final version will play nicely with these fine programs too. 

Did I say it prints Filaflex great, let me say it again. If you are for printing flexible parts mostly, look no further, this is your printer!


The right interface

$
0
0
When I was a teenager I was an avid reader of electronics magazines. What was available at home at first and later what I could afford. I remember that my favorite ones was Elektor magazine, that grew from a German-only magazine to be distributed to other languages and countries, mine included. They have this great summer edition that included over a hundred different small circuits.

Over the years I have almost stopped buying magazines (not because they are bad but because they use shelf space and I have not much time to read them). The last paper copies I bought were from Circuit Cellar Ink, but these same guys decided that a digital edition will ease their business, and for those abroad it will be be much cheaper. Selling bits is a good idea that seems to be making Google and many others much good. I even wrote several articles for Circuit Cellar magazine about different projects I made.

A few years ago I learned that Circuit Cellar Ink was acquired by a European group that handled Elektor magazine too. I was invited to a couple of meetings in Germany, together with other international authors, where the future of magazines was discussed. I guess there is an ongoing battle between paper and digital copies, the latter being painfully easy to copy. But at the same time, I found myself not very happy with the way I would browse a digital magazine.

Business like Zinio pop up, offering a better protected distribution than just a bare PDF, but as a I user I always felt these DRM platforms will make my accessing to the content I paid more difficult should I have to renew my computer.

When nobody expected the iPad, the tablet revolution brought a new type of computer that was definitely more friendly to be used for browsing magazines. Apple saw the opportunity and created their own news stand on the Apple store. Later with iBooks they offer an easy tool to create richer documents, but being old fashion I am closer to PDF format for magazine contents. Google did a similar thing for Android.

For me, what is wrong with browsing a magazine in my computer screen is the latter, I mean the screen, which is exactly the wrong format for portrait magazine content. Unfortunately, the first iPad did not worked well with the PDF files that I was receiving from Circuit Cellar magazine at the time.

But I am writing this today because I found myself browsing an Elektor magazine PDF on a not so new Samsung tablet with no problem at all, while sitting on the coach. It is definitely a much better experience than using a modern laptop with a beautiful display but with the wrong format for the content.

So for me, the tablet is the right interface for magazine content and I love it because no matter how many issues are stored, it does not grow my shelf space needs!!

Banging my head with Java line separator

$
0
0
One of the most unpleasant experiences with computers is having to solve a problem you already fixed when you
realize the old solution is no longer working for reasons unknown.

The problem this morning was quite silly, actually. One piece of code created a text file. I did not care much about the way newlines were represented but when  I sent the file to to a colleague that uses Windows he complain notepad was making a mess out of it.

It was clear notepad was doing this because my file, created on a unix system, did not honor Windows end of line convention of CR plus LF characters (0x0d + 0x0a). I have solved that in the past just changing the System property called line.separator. You could do that with System.setProperty("line.separator","\r\n") but apparently not anymore. Of course, no error message or exception is raised, so you are left alone, in the dark, trying to figure out what is wrong and why what worked before does not work now.

I could not make much sense out of it, but I hate these changes that make me waste my time for no known good reason. It just seems the JVM ignores my changes to the property, still named the same way, for the same purpose. It vaguely mentions that a SecurityManager might be needed but I did not explore the problem further, I just learned that, without changing the code, I could use java -Dline.separator=$'\r\n' MyProgram to get it working with the new value for line separator property, so I did and got the problem solved, or almost all.

A few lines of my text file came from a configuration file that, again, did not follow Windows convention. So as I wanted to get the problem sorted out for all the lines and not only those generated from Java code, I had to figure out how to, easily, use vi to replace the LF end of lines by the real deal CR LR. I guess I did that once or twice years ago but I could not remember how to do it now. Long story short: %s/\n/\^M\r/gand please note that for obtaining ^M you need to press Ctrl+V and then Ctrl+M. I am thankful the backslash preceding ^M was mentioned in stackoverflow as its need was unclear to me.

A simpler way of getting a Windows-friendly text file from vi is to use the command :set fileformat=dos


Simple schematics on the web

$
0
0
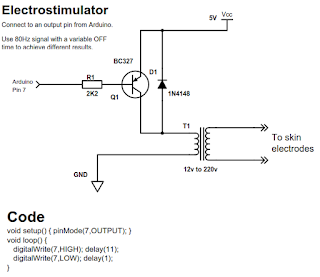
I wanted to create a simple schematic for my students. I could use an electronic CAD system but I needed something simple and quick. I look it up on the Internet and I have found a few choices. The first one was from Digi-Key and it worked nicely for my job as shown below (you may want to click on the image to get it to readable size).


It was documenting the circuit of a simple electrostimulator to be used with an Arduino for creating some pain. One of my students wanted to build an Arts installation will cause him physical pain and this one fits the bill. For the rest of the people, the usual disclaimer is in place: use it at your own risk.

Native 64bit Meshmixer version

$
0
0
I have just noticed there is a new version of Autodesk's Meshmixer software available for Linux but this time is no longer running over wine but it is compiled to run in Ubuntu 14.04 64bit. And the first tests suggest it works reliably (only crashed once when searching on the online 123D library).

It is a great program and it is free to use so I find myself using it from time to time. There are quite interesting but unexpected uses.

It is been a while since I last checked, so do not bash me if this is not new news for you, I now it was released first around March 2015, but I am a bit slow :-)

Getting dropcutter to work

$
0
0
For my CAM project I was using a 3D offset of the parts to compensate for the tool diameter. But i have recently have incorporated a new feature so 3D assemblies of blocks can be represented in 3D. For the automatic assembly (courtesy of Carlos Sánchez) I cannot use the offset surfaces but I have to use the original meshes.

One way of machining a 3D mesh is dropcutter algorithm, that in a nutshell works by modeling the milling bit and setting the z-depth at each XY location so the model is barely touched by the tool. As meshes are made of triangles, each feature of them is tested for contact: edges, facets and vertices. The feature with the highest z-depth value will set it for that particular location.


I have found a lot of insight and useful information in Anders Wallin blog. Though my initial approach was to adapt his monocam's C# code to Java, I ended up with a buggy result. Anders released later a C++ library, opencamlib, that is most likely a much improved version, but I did not test that. Instead I built from scratch my own Java version that now seems to begin to behave properly.  It was not too hard as I am only implementing the ball-nose cutter (that is why you see the yellow spheres above representing the tip of the cutting bit).

You can can have a better view of the above here:


And in case you are wondering what the hell this part is, you can see where it will fit in:


Viewing all 217 articles
Browse latest View live